Monday, June 1, 2015

Calculating Forcing Moves: Defensive Idea 5 - Counterattack to DEFEND (Idea 1, capture)

In the last few posts on counterattacking we created Equal or Greater Threats (EGT) that allowed us to force a WIN, and to force DRAWs (by stalemate, repetition, and material).

The next few posts will look at “counterattacking to DEFEND”, which is using EGTs to allow the use of one of the first four defensive ideas:

  • Defensive Idea 1 – do something to the attackers (capture, pin, deflect, restrict);
  • Defensive Idea 2 – block the attackers
  • Defensive Idea 3 – move the piece being attacked
  • Defensive Idea 4 – defend the piece/square being attacked

In this first post we will use an EGT to allow us to use defensive Idea 1, capture the attackers.  How is this different from Idea 1?  The key difference is tempo, as I’ll explain below.

Black just played 1…Nf4.  White to move.

1k1r4/1b2R2p/p1qP4/1p2Q3/1P3np1/P7/2P2PPP/3R2K1 w - - 0 1

Let's evaluate the position, and then find and prioritize all of black's threats.

Evaluation:  White has a two point material advantage (rook and three pawns vs bishop and knight).  White’s pieces are actively placed, his king is less exposed than black’s, and his advanced passed pawn is a major strength.

Threats:  Black’s threat is 2…Qxg2#, as well as …Ng6 forking white’s queen and rook.  The checkmate threat is clearly our priority for calculations.

Let's look at the five defensive ideas to see what options white has to defend against the checkmate.

Idea 1 – do something to the attacking pieces (the c6 queen, f4 knight, and b7 bishop).  We cannot capture or pin (must be absolute) the queen.  We can capture black’s f4 knight, but quickly see that is easily refuted with 2…Qxg2#.
We can also capture black’s b7 bishop.  This is a perfect opportunity to discuss the difference between Idea 1, and Idea 5.  Take a look at the below position, in particular how the new position of the black king (now on a8) changes things.

1k1r4/1b2R2p/p1qP4/1p2Q3/1P3np1/P7/2P2PPP/3R2K1 w - - 0 1

With the black king on its new square, capturing the bishop now does nothing to prevent the checkmate because 2. Rxb7 Qxg2#.  In this modified position neither of the captures we found using Idea 1 would work since black would still be able to checkmate with 2…Qxg2.

But in the original position with the black king on b8, taking the bishop now comes with check (2. Rxb7+) and black has to spend his next move getting out of check instead of delivering checkmate.  A capture-check should always be appreciated for the extra time it gains.  Sticking rigidly with the structure of this blog series I will put this capture-check under Idea 5 because the check is a GREATER threat than the checkmate threat.  However, this capture-check could easily be found by searching the board using either Idea 1 or 5.  Idea 1 has generated zero candidate moves.

Idea 2 – block the attacking pieces (the c6 queen from getting to g2).  White has four blocks (2. Rd5, 2. Qd5, 2. Qe4, and 2. f3).  Both of the queen blocks are very clearly bad for white after the immediate captures.  Only the rook and pawn blocks seem like viable candidates.   Idea 2 has generated two candidate moves.

Idea 3 – move the piece being attacked (the white king).  Since we have time, the king can prepare to move with 2.Kf1, allowing him to escape to e1 if 2…Qxg2+.  Moving the king the other direction (2. Kh1) still allows 2…Qxg2#.  Idea 3 has generated one candidate move.

Idea 4 – reinforce/defend the attacked square or piece (the g2 square).  The are two moves that defend g2 (both 2. Qd5 and 2. Qe4), however, we have already looked at both of these moves under Idea 2 and quickly rejected them.  Idea 4 has generated zero candidate moves.

Idea 5 – counterattack with an Equal or Greater Threat (of checkmate).  Looking at the EGT chart from earlier we can see that against a checkmate threat, you can only counterattack with a check.  White has two checks in this position (2. d7+ and 2. Rxb7+).  Idea 5 has generated two candidate moves.

This process has generated five specific candidate moves:


The next step is to calculate all five candidates starting with the most forcing move, the capture-check 2. Rxb7+:

2…Kxb7 seems the best of black’s four possible replies (two king moves, and two captures), since it keeps the checkmate threat alive, keeps two attackers on white’s passed pawn, gets the king more active, breaks white’s discovered check, and keeps the queen on the c-file attacking the c2 pawn.  Now, since black is still threatening checkmate in g2 white needs to defend, and we see we can now simply capture another attacker (using Idea 1) with 3. Qxf4.  White has traded his rook for two minor pieces and is up three entire pawns.  So far this variation looks very promising for white…but it is not over yet.   3…Qxc2 again threatens mate in 1, but white can regain the pawn and defend his rook (Idea 4) with 4. Qxg4, after which black has no clear refutations.  White is up three pawns, and is winning.  That makes Rxb7+ our King of the Hill (KOTH).


Let’s see if white’s other candidates can force a position that is better than our KOTH, starting with the next most forcing move 2. d7+:

2…Ka8 looks best for black (out of his five possible replies), since it renews the checkmate threat with the fewest complications.  White will be hard pressed to prove that this variation is better for him than the first variation since this leaves black with too much play.  White is again forced to defend against the checkmate, and now only has one check that is clearly bad (3. Qb8+), has the one bad capture (3. Qxf4) from Idea 1 that fails to prevent the checkmate, the same four blocks as above (3. Rd5 and 3. f3 were the only viable options), and he can still move his king (3. Kf1).

Since none of these three options force black to respond, let’s see if we can quickly eliminate any of them as clearly bad.  The rook block seems to be the worst of the three since black can just capture, but let’s see if white gets any compensation:

3. Rd5 and black can just simplify to a won endgame with 3…Qxd5 (the most direct refutation, since black is now threatening checkmate on g2 and d1) 4. Qxd5 (forced) Bxd5 5. Re8 (promotion tricks seem like white’s only hope) Ne6 and black defends his rook and wins.  So we can clearly reject that block.

White’s other two candidates (after 2. d7+ Ka8, and now 3.f3 or 3.Kf1) expose the king to checks which certainly does not help white’s cause, but let’s see if white is still able to force a better position than our KOTH:

3. Kf1 and black can now get very active with two checks 3…Qc4+ and 3…Qxg2+, and the knight fork 3…Ng6.  It is very hard to imagine any of these are any good for white, but let’s just look at 3…Ng6 and see if white has a forced win (better than our KOTH of plus three pawns).

White is yet again on the defensive, and black's threat is to capture his queen (4…Nxe5).  We cannot capture, pin, or deflect the knight (Idea 1), and we can never block knights (Idea 2).  We can move the queen to several safe squares (Idea 3) but they all appear to be easily refuted (after…Qxg2+ followed by …Nxe7), and defending the queen does not make sense (Idea 4).  That only leaves counterattacks (Idea 5).  We can create an equal threat by attacking the queen with either rook (Re6 or Rd6) but black first evades the attacks with …Qxg2+ and then captures our queen.  An interesting counterattack -- and possibly forcing a more winning position than our KOTH -- is to force the promotion of the pawn with 4. Re8:

4…Nxe5 5. Rxd8+ Ka7 (forced, the bishop/queen blocks allow the promotion) 6. Ra8+ Bxa8 7. d8=Q and now white is up one point in material (rook and pawn vs bishop and knight), but alas this is NOT better than our KOTH, and it is black's turn to move and he at least gets his pawn back with 7…Qxg2+.  Even though this forced variation can continue black gets to have all the fine and is likely to win more material.  This is more than sufficient to reject our other candidate move 2. d7+.


That leaves us with three other candidates.  None of them are particularly forcing so it is extremely unlikely that they will be better than our KOTH.  Let's see if we can eliminate any of them as clearly bad.

Our rook block looks losing since after 2. Rd5 Nxd5 white is simply down material, and even though there is some play left he's running out of pieces and will be struggling to even draw.  We can reject this block.


White's other block (2. f3) and the king move (2. Kf1) both expose his king allowing black's pieces even more potential activity.  Let's see if our block somehow gives white a better position than our KOTH, after 2. f3:

White is threatening to capture black's knight.  His discovered check buys him an extra move, but it is not clear that there is a specific threat behind it other than trying to force promotion by following up with Re8.  So white's primary threat is to capture the knight.

We cannot capture, pin or deflect the queen (Idea 1).  We cannot block the queen since it is an 'in-your-face' attack (Idea 2).  We can move the knight (Idea 3) to all eight squares, but the fork (2…Ng6) seems most interesting.  We can defend the knight (Idea 4) two different ways (2…Rf8 and 2…Qc4).  We cannot create an equal threat since white does not have any minor pieces, but we can create a greater threat by attacking his rook and threatening mate (2…Qxc2), or giving check (2…Qb6+).  Of course the most forcing of these five candidates is the check 2…Qb6+:

3. Qc5 is white's most forcing defense (of six possible replies) and limits black's play the most, but I don't see how this is clearly better for white.  We can reject this check for black, and look at his next most forcing move two candidate, the other counterattack 2…Qxc2:

Black is again threatening checkmate, and we can consider this a refutation to white's block (2. f3) but let's play this out a bit further and see if white can pull off something better than our KOTH.  He can capture the knight (Idea 1), but that allows black to take his rook with check.  He can block the queen from getting to g2 (Idea 2) two different ways, but both blocks just lose material.  He can move his king (Idea 3), but one leads to checkmate anyway (3. Kh1 Qxg2#) and the other just loses the rook (3. Kf1 Qxd1+).  He cannot add another defender to g2 (Idea 4) that we haven't already considered under Idea 2.  The only counterattack (Idea 5) possible must begin with a check given the threat of checkmate, and he has two checks (3. d7+ and 3. Rxb7+).  Let's start with the most forcing the capture-check 3. Rxb7+:

Hey wait!  That's the exact same capture-check from the first position, which we know will allow us to next capture the knight.  This must be right!  And it would be except for one key difference.  3…Kxb7 4. Qxf4 Qxd1+! 5. Kf2 (only) and now black is winning.  Of course white does not have to capture the knight, and he can instead give check (4. Qe7+ is the most forcing since it also attacks the rook).   Even though there is more play for white in this line, we can reject it since white can't bring his rook into the attack with check, and he has the same dilemma of how to defend against checkmate (Qxg2#) and the capture-check (Qxd1+) at the same time.  He might be able to get equality but won't be able to force a position better than the KOTH so we can reject 3. Rxb7+.  All of white's other replies at move three were rather passive (the discovered check just buys one move but does not change the position), and are even more unlikely to force a better position than our KOTH.  Since there were no other moves in this variation for white to consider, we can drop this candidate.  Here's what our updated chart looks like:


The last candidate we have to consider is the king move (Idea 3) 2. Kf1:

2…Qxg2+ 3. Ke1 (only) Qg1+ 4. Kd2 (only) Qxf2+ 5. Kc1 (forced, 5. Kc3 Qf3+ looks good for black) Ng6 and black has equalized the material (rook and pawn vs bishop and knight) and it is not clear that white can keep his rook since now his capture-check (Rxb7+) only picks up one minor piece.  Even though there is a bit more play for white in this line, I do not see how from here he can force a position better than our KOTH.  So we can reject this variation as well.

Here is our final chart:


Conclusion:  This process has shown us that white has several candidate moves to consider in the initial position, and by calculating the most forcing moves first we defended against the checkmate and found the forced win!  In a real game we would not need to calculate as much as I did here.  Once we calculated that our most forcing candidate at move one (the capture-check Rxb7+) was winning, we could make the move and enjoy the rest of our win.  But for the sake of this exercise I went ahead and tried to prove that the other candidates were not as good as our KOTH.  

This is the process you should be able to do mentally:  prioritize the threats, use the five defensive ideas to search for specific candidate moves, calculate each one completely, and then pick the best variation based on the final evaluation.

In the next post we will look at positions where we use EGTs to rearrange our pieces to allow another of the basic defensive ideas (from Idea 1-4).

Tuesday, May 26, 2015

Calculating Forcing Moves: Defensive Idea 3, Part 2 (Prepare to Move)

When your opponent creates a (real) threat, or you are considering creating one against your opponent, there are five defensive ideas to consider.  We have already looked at different ways to implement the first two defensive ideas:  Idea 1 (capture the attacking piecepin the attacking piecedeflect the attacking piece), or Idea 2 (block the attacking piece).  We also explored the third basic idea of moving out of the attack.

In this post we will look at a position where we "prepare to move".  These moves are possible when the threat is one move away, and you have time to move another piece out of the way so that you can escape to, or through, that square when the threat is played.

The general process is to evaluate the position, identify and prioritize all threats, and then to use the five defensive ideas to identify specific candidate moves.  Next, calculate each candidate move to the end and evaluate the final positions (material and activity).  As you progress through the candidates, keep in mind the "king of the hill" (KOTH) candidate move to help you pick the best at the end.

The below position is from Ward Farnsworth's wonderful chesstactics.org website, but the analysis here is my own!  We'll follow the same approach as usual:  evaluate the position, identify and prioritize all threats, use the five defensive ideas to identify specific candidate moves, and calculate each candidate to find the best (or least bad) reply.

Black just played ...Qe7.  White to move.

5k2/pb2qp1p/1p6/6R1/3p4/8/PP4PP/R2N3K w - - 0 1

Let's evaluate the position and then find all of black's threats.  Black is up a queen and a pawn vs two rooks, and black's pieces and passed pawn are significanly more active than white's pieces.  Black is playing for a win and white is fighting to draw.  Black has two concrete threats:  checkmate (...Qe1#) and win a rook (...Qxg5).  Of those two threats, the checkmate is the priority.  Let's look at the five defensive ideas to see what candidate moves we find, and then pick the best move.  Hopefully we can avoid checkmate AND save the rook.

Idea 1 (capture, pin, deflect):  none.
Idea 2 (block):  1. Re5 and 1. Ne3 directly block the queen from getting to e1, while 1. Rf5 "prepares to" block on the next move with Rf1.
Idea 3 (move):  since the mate is one move away we can look at direct king moves, as well as moves that create an escape square ("prepare to move").  The king only has one move, but 1. Kg1 does not allow the king to escape checkmate because f2 will be covered by the queen on e1.  White can also "prepare to move" his king by creating an escape square on h2 (the bishop is taking away g2), by playing 1. h3 or 1. h4.
Idea 4 (defend):  white can defend the mating square on e1 with his rook on a1, if the knight can get out the way.  We already have 1. Ne3 from above, which we now see might accomplish two things at once (block the queen, and allow the rook to defend e1).  The knight has two other possible squares to move to 1. Nc3 and 1. Nf2.
Idea 5 (counterattack with an equal or greater threat to WIN, DRAW, DEFEND):  there is not time to create equal threat.  A greater threat would have to start with a check, and white has 1. Rg8+.

The five defensive ideas have given us eight actual candidate moves to calculate further:  1. Re5, 1. Ne3, 1. Rf5, 1. h3, 1. h4, 1. Nc3, 1. Nf2, and 1. Rg8+.  Let's start with white's most forcing candidate move 1. Rg8+:

1...Kxg8 (only).  White has lost a rook and has no more checks.  He therefore cannot force a draw by perpetual and is not able to reposition his other pieces to defend using the other four ideas.  Reject 1. Rg8+.

None of the remaining seven moves seem particularly more forcing than the others, so let's just go through them in the order that we discovered them.  1. Re5:

1...Qxe5 appears to be black's most forcing reply.  Black is again threatening mate with no new defensive options available and after 1. Nf2 black is ahead a queen and a (passed) pawn vs a rook, so 1...Qxe5 appears to refute white's candidate.  Reject 1. Re5.

The other block we found also defended e1, so let's next look at the interesting 1. Ne3:

1...Qxg5 appears to be black's most forcing reply, so let's see if that is a refutation.  White is now down more material and black again has two concrete threats:  to capture the knight and, should the knight move, to deliver checkmate with Qxg2#.  Simply pushing the d pawn also looks like a fun attacking idea for black, and would give white a third threat to have to defend against.  Saving the knight (and defender of g2) is white's first priority so let's look at the five defensive ideas and see if any work.  White cannot capture, pin (2. Rd1 doesn't work), deflect, or block the pawn or queen.  He can only move the knight to two squares that do not immediately allow mate (2. Ng4, and 2. Nd5).  He can defend the knight with 2. Re1 but, after 2...dxe3 the rook cannot recapture on e3 because of the mate threat on g2.  That only gives us two defensive ideas, both of which just delay the mate in 1 by one more move.  Then after the obligatory 3. Rg1, black's two threats (passed pawn and checkmate) will make for a simple win, and we can safely say that 1...Qxg5 refutes white's candidate.  Reject 1. Ne3.

The last blocking idea we found prepares to block on f1 after Qe1+, but seems easily refuted.  After 1. Rf5:

1...Qe1+ 2. Rf1 (only) Qxf1#.  Yup, easily refuted.  Reject 1. Rf5.

Next up would be the two candidate moves that create an escape square for the white king, and prepare for him to move out of the check.  Let's look first at 1. h3:

1...Qe1+ is black's most forcing move, but after the king moves away with 2. Kh2, black has no clear follow-up.

1...Qxg5 appears stronger for black, since he is now up even more material and is threatening checkmate on the next move with ..Qxg2.  After considering all five defensive ideas, we find whites' only move to prevent the mate is 2. Ne3 following by 3. Rg1.  So while 1...Qe1+ does very little for black, 1...Qxg5 is a crushing refutation.  Reject 1. h3.

The other block seems much more interesting because it also defends the rook on g5, so let's see if black has anything left after 1. h4:

1...Qe1 (again black's most forcing move) 2. Kh2 (only) Qxh4+ 3. Kg1 (only) Qxg5 4. Ne3 (forced) dxe3 5. Kf1 (only way to prolong...) Qxg2+ 6. Ke1 Qf2+ 7. Kd1 (only) Qd2#.  Reject 1. h4.

The final two candidate moves (1. Nc3 and 1. Nf2) come from the idea of defending the e1 mate square.  Since 1. Nc3 puts the knight en prise, let's see what we get with 1. Nf2:

1...Qxg5 (most forcing) 2. Rg1 (forced) and now Qd2 appears simple and wins at least the b pawn (defending the pawn with 3. Nd1 allows Bxg2+ 3. Rxg2 (only) Qxd1+ 4. Rg1 (only) and now black has won a pawn and traded the minor pieces but also has ...Qf3+ followed by ...d3.).

White's last defensive hope is 1. Nc3:

1...Qxg5 (most forcing) 2. Rg1 (forced) and now black just picks off the c3 knight, making this line worse than 1. Nf2.

After looking at eight candidate moves, we can confidently resign knowing that we have not missed a single defensive opportunity for white.  If we felt compelled to play on for some sadistic reason, the two least bad moves would be either 1. Rg8+ or 1. Re5, which "only" leave black ahead a queen and passed pawn vs a rook.  All other moves are worse than that!  In future posts I will discuss ways to track multiple evaluations in your head while calculating, including positions where all of your choices are relatively bad or your best move is only slightly better than the second best!

Calculating Forcing Moves: Defensive Idea 2, Part 2 (Prepare to Block)

When your opponent creates a (real) threat, or you are considering creating one against your opponent, there are five defensive ideas to consider.  We have already looked at three different ways to implement the first defensive idea of going after the attacking piece:  capture the attacking piecepin the attacking piece, or deflect the attacking piece.  In an earlier post we looked at the second defensive idea of blocking the attack.

In this post we will look at a position where the threat is not immediately on the board but is likely to be played on the next move (like a mate-in-1 threat), and we will use the idea of "prepare" to block" by rearranging our pieces to allow a block if the threat is executed.  

The general process is to evaluate the position, identify all threats, and then to use the five defensive ideas to identify specific candidate moves.  Next, calculate each candidate move to the end and evaluate the final positions (material and activity).  As you progress through the candidates, keep in mind the "king of the hill" (KOTH) candidate move to help you pick the best at the end.

The next position uses the same basic defensive idea of blocking an attack, but also demonstrates how blocking with a like piece can gain time and be more forcing than blocking with other pieces.

Black just played Qe6+.  White to move.

r4r2/4ppBk/p2pq1p1/1p5n/4P2P/P4P2/KPPQ4/3R1BR1 w - - 0 1

Let's evaluate the position and then find all of the threats.  Pawns are equal, both sides have one queen and two rooks, and although white is currently up a minor piece his bishop on g7 is en prise and he is in check.  Will white have time to save his bishop?  Black's threats are the check, and then to capture the g7 bishop on his next move, after which material will be equal.  White is also threatening checkmate with Qh6#, but needs to address both the check and the threat to his g7 bishop.  Let's look at white's three defensive ideas (you can't defend or counterattack when in check!) to see what candidate moves we find, and then pick the best move.

Idea 1 (capture, pin, deflect):  none.
Idea 2 (block):  searching square by square between the queen and the king we find four moves that block the check: 1. Qd51. c41. Bc4, and 1. b3.
Idea 3 (move):  1. Ka1, and 1. Kb1
Idea 4 (defend):  n/a
Idea 5 (counterattack with an equal or greater threat to WIN, DRAW, DEFEND):  n/a

Let's look at the easiest to calculate moves first (instead of the most forcing).  After both king moves, black just captures the bishop (if 1. Ka1/Kb1 Kxg7) and the position is materially equal.  This is our KOTH.

Now let's look at calculate each block and see if we get anything better than our KOTH evalulation of equal.

If 1. Qd5 white has no threats (because Qh6# is no longer an option) and black can simply take the bishop, or can take the queen first with check and then the bishop.  Black has nothing better, and this line is no better (and no worse) than our KOTH.

If 1. c4 white now has one threat to deliver mate with Qh6#.  Black can easily address the one threat threat by capturing one of the attackers with Kxg7.  Black has nothing better, and this line is no better (and no worse) than our KOTH.

If 1. b3 again white now has one threat to deliver mate with Qh6#.  Black can easily address the one threat threat by capturing one of the attackers with Kxg7.  Black has nothing better, and this line is no better(and no worse) than our KOTH.

If 1. Bc4 white now has two threats - to capture the queen, and to deliver checkmate.  The checkmate is the greater threat so lets look at black's defensive options.

Idea 1:  Black can capture the g7 bishop with 1...Kxg7 or 1...Nxg7.
Idea 2:  Black can block the white queen from getting to h6 with 1...Nf4 and 1...g5.
Idea 3:  Black can defend the mating square on h6 again with 1...g5.
Idea 4:  The black can escape with 1...Kg8.
Idea 5:  Black's counterattack ideas must begin with a check, given white's checkmate threat, and black only has one:  1...Qxc4+

Of black's six candidate moves we can quickly dismiss five -- the two captures, the two blocks, and the move -- because they all immediately lose the queen.  That only leaves black's one counterattack idea, so after 1. Bc4 Qxc4+:

We have the same exact same situation as in the starting position, except now white is down an entire piece and, as soon as white addresses the check, black is going to capture the g7 bishop.  This would leave white down an entire piece and appears to refute white's 1. Bc4, no?

Here again white has two king moves (both of which leave white down a piece, and is worse than our KOTH), and one block with his tiny pawn.  However, that pawn block comes with a punch, because it is again attacking black's queen!  So after 1. Bc4 Qxc4+ 2. b3:

After this simple block by the simplest of pieces, the roles have again been reversed and now black has to deal with two threats!  The checkmate threat takes priority, and no matter what black tries the best he can do is go desperado and snatch a pawn and the g7 bishop for his queen.

This position demonstrates very clearly the power of blocking with a like-piece, and how you can turn a simple pawn block into a game-winning counterattack!  This position also shows the risks in counterattacking!  Looking at the original position, black should have calculated his move Qe6+ a bit longer.  It clearly would have been much safer for black to have just captured the g7 bishop instead of going for a some fancy counterattack/intermezzo!!

Finally, the last position demonstrates additional blocking options when the threat is one move away.  In this position you can expand the block concept to moves that "prepare to block", by either moving a piece into position to block once/if the threat is played, or by moving the king out of the way to allow a piece to block.

I'll leave this last one as a puzzle.  It is white to move:

5rk1/2p4p/Bpn1p3/p2PP1q1/3PP3/PP3p2/1BQ2P1r/2RR1K2 w - - 0 1

[HIGHLIGHT TO SEE ANSWER:  White's only defense is to move his king to allow the a6 bishop to block: 1. Ke1 Rh1+ 2. Bf1]

Thursday, May 7, 2015

Calculating Forcing Moves: Defensive Idea 5 - Counterattack to DRAW (repetition)

In this series of posts we are looking at “counterattacking to DRAW”, which is using Equal or Greater Threats to force three types of drawn positions:

  • Draw by stalemate;
  • Material draw (equal material, fortresses, etc); and,
  • Draw by repetition.

In the last two posts we looked at positions where there were clear threats on the board, and we created an EGT that allowed us to force drawn positions by stalemate and by reaching a drawn endgame.   In this post we’ll look at a position where the best move is to use a series of EGTs to force the opponent to repeat the position, resulting in a draw.

Black just played 1…Kxf4.  White to move.

2n5/3pB3/p3p3/2Q2n2/3p1kb1/1r6/q4PBK/3r4 w - - 0 1

Let's evaluate the position, and then find and prioritize all of black's threats.

Evaluation:  White is clearly losing. Black is up two rooks, a knight, and three pawns.   White is considering whether he should do the noble thing and resign.  The only thing going for white is his extreme lack of pieces and almost complete immobility…this immediately brings to mind stalemate themes.

Threats:  Black’s threats are many, but the fastest forced checkmate I can find is 2…Rh3+ 3. Bxh3 (only) Qxf2+ 4. Bg2 (only) Qg1#.

Let's look at the five defensive ideas to see what options white has to reply to the threat.

Idea 1 – do something to the attacking pieces (the g4 bishop, both rooks, and the queen).  We cannot capture, pin (absolute, given the mate threat), or deflect any of black’s attacking pieces.

Idea 2 – block the attacking pieces (the g4 bishop, both rooks, or the queen, from getting to h3, f2, or g1).  White has five blocks (2. Qc3, 2. Qc2, 2. Bf3, 2. Bg1, and 2. f3), but in all cases black simply captures with the queen or rook, which reinstates the same threat.  If the bishop leaves g2 (for 2. Bf3 and 2. Bg1), this simply allows a capture-check and a new forced mate (2…Qxf2+ 3. Bg2 Qg1#)

Idea 3 – move the piece being attacked (the white king).  The king has zero legal moves. Creating an escape square for the king by moving the bishop somewhere threatening (like say 2. Bd5) allows the same capture-check and a new forced mate mentioned in Idea 2 (2…Qxf2+ 3. Bg2 Qg1#).  Moving the bishop to f1 blocks the first rank, but still allows the new forced mate.

Idea 4 – reinforce/defend the attacked square or piece (the h3, f2, and g1 squares).  The are two moves that defend h3 (2. Qa3, and also 2. Qc3 that we looked at under Idea 2) but in both cases black simply captures the queen.  There are three moves that defend f2 (2. Bh3, 2. Qc2, and 2. Qxd4) but again black simply captures and checkmate is back on.  There are zero moves that defend g1 a second time.

Idea 5 – counterattack with an equal or greater threat (of checkmate).  Looking at the EGT chart from earlier we can see that against a checkmate threat, you can only counterattack with a check.  This is a good place to recall my earlier post on counting checks.  Instead of looking at every piece and then searching for each and every check, we can see that only the queen and dark-squared bishop can check the king, which equals a maximum of 14 checks because the bishop normally has 2 (unless one is off the board), and the queen has 12 when she is on the same color square as the target -- that is three checks in each of the four directions the queen can move.  (She only has ten checks when on the opposite color square, because there are only two on each diagonal instead of three.)  In this position the queen has two checks along the 5th rank (2. Qe5+ and 2. Qxf5+), two checks along the c-file (2. Qc7+ and 2. Qc1+), one check on the a3-f8 diagonal (2. Qd6+) and one check along the a7-g1 diagonal (2. Qxd4+).  The bishop can deliver both of its checks (2. Bg5+ and 2. Bd6+), for a grand total of eight checks.

This process has generated eight specific candidate moves, all of which are checks:


The next step is to calculate all eight of the candidate checks.  As I noted in earlier posts about counterattacks we do not know the outcome of the counterattack when we begin calculating, but in this case the position is so extremely bad for white that we can only accept extreme outcomes – a forced checkmate, or forced draw by stalemate or repetition.  We will not be able to capture enough material to reach an equal (or materially-drawn) position, and we won’t be able to construct a fortress.  Even if we could use checks to allow another defense against the checkmate, we’d still be losing.

How to pick which check to calculate first?  They are all forcing, but some are more forcing than the rest meaning they allow white fewer replies.  Quickly counting replies for each check, I see that two of the checks (2. Bg5+ and 2. Qe5+) only offer black one single reply, so we’ll start with those.  I actually do this “reply count” in my head as I’m counting checks to see which checks offer the fewest replies.  Let’s start with 2. Bg5+:

2…Kxg5 (only) and now white must keep delivering checks, hopefully to rid himself of all mobile pieces (the queen, pawn, and bishop) to force stalemate and we have 3. Qe7+ or 3. f4+.  There could be move order issues here so we’ll try both ways.  Let’s start with the queen check first:

3. Qe7+ Kf4 (if either knight captures the queen, 4. f4+ allows white to immobilize his pawn and self-pin his bishop -- stalemate) 4. Qg5+ Ke5 (4. Qd6+? Nxd6 avoids stalemate; if 4…Kxg5? 5. f4+, stalemate).  Here white has five queen checks and one pawn check.  Black cannot capture the queen if his king is on e5 or g5, since it allows f4+ (and stalemate), so the black king must move away from those squares before he can capture the queen.  White of course does not want to allow the black king to get away from those squares.

That eliminates three of white’s checks (all of the queen checks on the f-file), leaving three checks: 5. f4+, 5. Qg7+, and 5. Qe3+.  Since shedding the pawn is an important goal, and the two queen checks seem to allow the king to leave e5, let’s start with:

5. f4+ Kd6 (only) 6. Qe7+ (only check) Nfxe7, and now there is no stalemate because the pawn can move to f5 without a check.  Let’s try white’s two other checks at move 5:

5. Qg7+ Kd6 (5…Kf4 allows 6. Qg5+ leading to draw by repetition), and here white has five checks but since the black king is now not on e5 black can capture the queen.  This only allows white two checks -- one where black cannot capture the queen (6. Qf8+), and one where the capture would put the black king back on e5 (6. Qe5+).  After 6. Qf8+ Nce7 and now both of white’s checks allow black to capture.  That leaves 6. Qe5+ Ke7 (only) 7. Qc5+ (white’s four other checks allow black to capture) Ncd6, and white has no checks and black has avoided the stalemate.  That only leaves one other candidate check at move five:

5. Qe3+ Kd6 (capturing the queen allows the pawn check, and stalemate), and just like in the last variation, again white has five checks but since the black king is not on e5 black can capture the queen.  This only allows two checks -- one where black cannot capture the queen (6. Qf4+), and one where the capture would put the black king back on e5 (6. Qe5+).  We already know from above that 6. Qe5+ Ke7 allows black to avoid the stalemate, so we only need to calculate:  6. Qf4+ Ke7 (looks best; 6…e5?? 7. Qxe5+!; and 6...Kc5 looks good for black too, but white still has lots of check while after 6…Ke7 white very quickly runs out of safe checks) 7. Qg5+ (only safe check) Kf7!, and now white has no more checks.  White can capture the bishop, and perhaps a rook as well, but this is still completely won for black and white still has too much mobility to try for stalemate.

So all of white’s move 5 ideas failed to force checkmate or force a draw, so let’s back up a move and look at white’s other move 3 option, after 1…Kxf4 2. Bg5+ Kxg5 (only) 3. f4+:

3…Kh4! (threatens …Rh3#) 4. Qe7+ (only check) Nfxe7 5. f5 (only) Rh3#

After our first candidate move (2. Bg5+), white cannot force mate and cannot force a draw but since he has evaded checkmate so far and is in a position to capture some black pieces (in the variation after 5. Qe3+), we’ll make this our KOTH.


Only seven more checks to go!!  Deep breath…and moving on to the next most forcing check:

1…Kxf4 2. Qe5+ Kxe5 (only), and here white has three checks but one of them is the most forcing (allowing only one reply), 3. f4+ Kxf4 (only), and we are one step closer to stalemate.  We only need to get rid of our overly-mobile bishop using checks, of which we have two:

If 5. Bd6+ Ke3 and white will soon run out of checks, and will lose.  That leaves us with one last check in the variation:

If 5. Bg5+ Ke5 (forced, 5…Kxg5? is stalemate) 6. Bf6+ Kd6 (forced, 6…Kxd6? is stalemate, and 6…Ke5 repeats) 7. Be7+ Kc7, white just needs to keep checking and now allow the black king to get to c5 or b6, so 8. Bd8+ Kb8 9. Bc7+ Ka7 (only) 10. Bb6+! Kb8 (not 10. Bb8+? Kb6!, and black can get to a light square and escape the checks) 11. Kb8 Bc7+, and although we can’t force the black king to capture our last mobile piece which would force stalemate, repeating the position is black’s only way to not capture the bishop, which is good enough for the draw!

Normally we would note the drawing option, and then continue calculating the other six checks.  But since a draw is really all we can hope for from the starting position, there is no need to keep calculating!  Here is our final chart:


Conclusion:  So this process has shown us that white has several candidate moves to consider in the initial position, and if we follow the path of the most forcing moves first we are able to find the forced draw!  Black has no say in the matter, and his only choice is whether to allow draw by stalemate or repetition!

This is the process you should be able to do mentally:  prioritize the threats, use the five defensive ideas to search for specific candidate moves, calculate each one completely, and then pick the best variation based on the final evaluation.

In the next post we will look at positions where we use EGTs to rearrange our pieces to allow one of the basic defensive ideas (from Idea 1-4).

Thursday, April 23, 2015

Calculating Forcing Moves: Defensive Idea 5 - Counterattack to DRAW (material)

In this series of posts we are looking at “counterattacking to DRAW”, which is using Equal or Greater Threats to force three types of drawn positions:

Draw by stalemate;
Material draw (equal material, fortresses, etc); and,
Draw by repetition.

In the last post we looked at a position where there was a clear checkmate threat on the board, and we created an EGT that allowed us to force stalemate.   In this post we’ll use an EGT to force a trade of material so that the resulting position is a material/technical draw.

White just played 1. Rb8.  Black to move.

qR6/p7/3Q1nk1/5p2/r1P1pP2/4P1K1/P7/8 b - - 0 1

Let's evaluate the position, and then find and prioritize all of white's threats.

Evaluation:  Black is up two points (one white pawn vs black knight), but white’s passed pawn could offer white some opportunities and his pieces are more active than their black counterparts.

White’s advantage in activity is temporary and can easily slip away.  Black’s material advantage is significant and more durable.  This material/activity imbalance is similar to our earlier “counterattack to WIN” position.  There we were black and, like in this position, had a two point material advantage (a white bishop vs a black rook).  We won by using an EGT to force equal trades that lead to a winning position.  The same basic plan holds true in this position.  If black can force equal trades of material he will have a winning material advantage.

Threats:  White’s threat is to capture black’s queen, and if the black queen leaves the back rank white could have some play against the black king and pinned knight.  So 2. Rxa8 is the priority threat for calculations.

Let's look at the five defensive ideas to see what candidate moves we can find for black to reply to the threat.

Idea 1 – do something to the attacking piece (the b8 rook).  We can capture it (1…Qxb8), we cannot pin it to anything of greater value, and we cannot deflect it.  So Idea 1 has generated one specific candidate move.

Idea 2 – block the attacking piece (the b8 rook).  Not possible because there are no squares between the rook and queen. I call this an “in your face” attack.

Idea 3 – move the piece being attacked (the black queen).  The queen can move to three other squares (b7, c6, and d5), but they all appear unsafe and a quick calculation does not reveal anything good for black (ie, no tactical tricks after the captures).

Idea 4 – reinforce/defend the attacked square or piece (the black queen).  There are no legal ways to defend the queen.

Idea 5 – counterattack with an equal or greater threat (of winning the queen).  Looking at the EGT chart from earlier we can see that against a threat to your queen, you have one equal target (the enemy queen) and two greater (check and a mate threat).  In this position we have one move that creates an equal threat (1…Ra6), but we have zero checks and cannot create any mate threats.

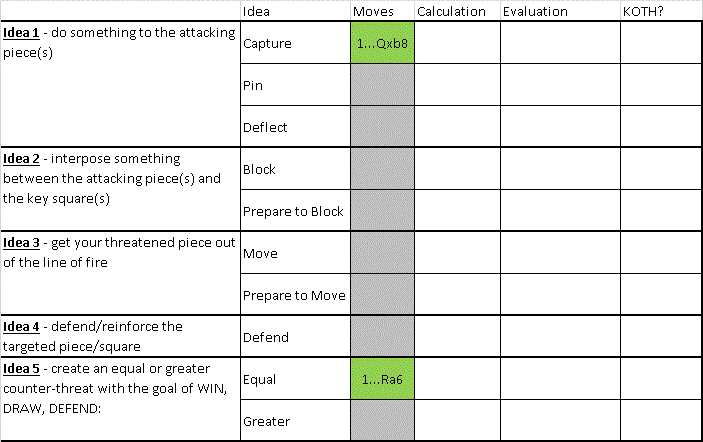
This process has generated two specific candidate moves:


The next step is to calculate both of those candidates.  How to pick which one to calculate first?  We can either start with the most forcing, or the easiest to refute.  Let’s start with the most forcing, the capture 1…Qxb8:

After the natural 2. Qxb8 Rb3 (2…Rxc4 3. Qxa7) 3. Kf2 Rxa2+  white has an advantage in material and activity.  White now has a one point material advantage (Queen vs Rook and Knight), and white’s passed pawn is making good progress while black’s pieces are rather passively placed.  The white king is slightly encircled but there are no real threats because black’s pieces aren’t coordinated and the black king is exposed.  The black knight has a check, but it only puts the knight further away from the action.  Black should reject this line.


That only leaves one other candidate move.  At this point you might say, why calculate the other line?  If we only have two candidate moves, and have determined one is bad why calculate the second?  We could certainly do that IF the candidate we calculated first lead to checkmate.  Then there would be no doubt about it, anything must be better than getting mated so just play the second candidate and calculate later.  But the evaluation was not absolute.  Yes it is bad for black, but it wasn't checkmate, and if our second candidate also turns out to be bad for black we might have to pick from the "least bad" candidate.  So we can't completely reject the candidate just yet.

So on to the next candidate move -- the equal counterattack against white’s queen with 1…Ra6:

Here we go with the wild world of counterattacks. Again we need to keep in mind all three goals when moving through these variations – WIN, DRAW, or DEFEND.  I mentioned in the last post I like to start by looking for draws by stalemate first because it is easiest to eliminate.  A quick glance at this position shows black does not have many pawn moves, but his king has plenty of squares.  So stalemate is not a defensive option for black.

As noted above black has a material lead of two points black and would WIN if white allows equal trades, which means white wants to avoid:

2. Rxa8 Rxd6 3. Rxa7 Rd2!? Even though black’s material advantage is now only one point (two white pawns vs a black knight) and white has two passed pawns, black’s rook and knight are positioned well to capture them, and white’s king is out of play.  For a beginner this might be a tough position to win as black, but black is indeed winning and white is hoping for a draw.  So white would reject the equal trade of queens starting with 2. Rxa8.  White should also reject the equal trade of rooks:

2. Qxa6 Qxb8 which is even worse for white than the equal trade of queens!

We have looked at both piece captures to prove they are bad for white (since black WINs), but what other candidate moves does white have?  We have to keep in mind the material/activity balance.   If he pursues equal trades, he will lose.  If white allows the material balance to remain the same he will lose for example, any move by white’s queen to escape from black’s rook will allow the black queen to also escape from a8.  All of this is good for black, but bad for white.

White does have another capture, which also happens to be the most forcing move on the board -- the capture check:

2. Qxf6+! Kxf6 (Rxf6?! and the rook is now passive) 3. Rxa8 Ra3!?4. Kf2 Rxa2+ and as Tarrasch said “all rook endgames are drawn.”  Black’s rook is more active than white’s, but it is only a tiny edge and this is a draw.  For white, this appears to be his best option and I see no other candidate moves that are better for white (all others lose!).

Here is our final chart:


Conclusion.  This process has shown us that black has only two candidate moves to consider in the initial position -- one of them leads to a loss if white plays properly, and the other leads to a drawn endgame.  So black's best choice is to try for the draw.

This is the process you should be able to do mentally:  prioritize the threats, use the five defensive ideas to search for specific candidate moves, calculate each one completely, and then pick the best variation based on the final evaluation.

In the next post we will look at positions where the best defense is draw by repetition.

Tuesday, April 14, 2015

Calculating Forcing Moves: Defensive Idea 5 - Counterattack to DRAW (stalemate)

In the last post we looked at positions where there was a clear threat on the board, and we defended by creating an equal or greater threat (EGT).  In that position we used two checks to force an equal trade of one of the pieces threatening mate, which, since we were up material, resulted in a winning position.

As noted in the last post, when we find we can create an equal or greater threat, it is often unclear where it will lead and the variations can become quite sharp and complicated.  To maintain focus through those complicated variations, I recommend looking for all three possible outcomes with your counterattack:  win, draw, or defend.

Last post we looked at positions where we were able to use an EGT to force a winning position.  In this next series of posts we’ll look at positions were we use an EGT to force positions that are draws.  So let's get started!

When it comes to drawing there are three types of positions you can try to reach:
Draw by stalemate;
Material draw (equal material, fortresses, etc); and,
Draw by repetition.

I personally start my search for draws by looking for stalemates, then for material draws.  This is because the analysis for stalemate/material draws can often be done quickly based on a material evaluation, and maybe some short calculations to see if you can forcibly trade off pieces.  Draw by repetition is often more dynamic and can involve some pretty cool positions with lots of material still left on the board.

For this post I am going to follow the same process I’ve used in previous posts for analyzing the position -- evaluate the material, identify/prioritize threats, and search for specific moves using the five defensive ideas.  But -- based on feedback from Tomasz -- I am going to try out another format for presenting the analysis.  Let me know what you think!

 Black just played 1…d2.  White to move.

8/8/8/2p5/2P5/kr6/1r1p4/K1Q5 w - - 0 1

Let's evaluate the position, and then find and prioritize all of white's threats.

Evaluation:  White is down two points (Queen vs two Rooks and a Pawn), and all of black’s pieces are very active compared to white’s.  Black is playing for a win, and white is fighting for a draw.

Threats:  Black is threatening to capture white’s queen and promote to a rook/queen giving checkmate.  If the white queen moves and unpins black’s b2 rook, black can checkmate with …Ra2#, and if the white queen leaves the defense of the first rank (b1 in particular) black will checkmate with …Rb1#.  If we skip white’s move we would quickly see that the most immediate checkmate threat is 2…dxc1=Q/R#, which is our priority for calculations.

Now that we have found black’s greatest threat, let's now look at the five defensive ideas to see what candidate moves we find, calculate each one, and then pick the best move. I am going to try this chart format to support the verbal analysis.  Hopefully this helps convey the ideas a bit better, but let me know what you think.  Take a look at this chart:


The five defensive Ideas are in the column on the left.  Then there are columns for specific moves, space to calculate those moves, enter the evaluation, and then track your King of The Hill rating.  This follows the general process of calculation – use ideas to generate specific candidate moves, calculate each one completely, then pick the best move.

We will start the process by searching for specific moves to put in the “moves” column next to each of the five ideas.

Idea 1 – do something to the attacking piece (the d2 pawn).  We can capture it (2. Qxd2), we cannot pin it to anything of greater value, and we cannot deflect it.  So Idea 1 has generated one specific candidate move.  We enter it, and move on to defensive Idea 2 to search for more candidates.

Idea 2 – block the attacking piece (the d2 pawn).  It is not possible because there are no squares between the pawn and queen. It is in fact never possible to block a pawn, knight, or king.

Idea 3 – move the piece being attacked (the white queen).  There is only square the queen can move to that keeps an eye on all three key squares (a2, b1, and d1) – that gives us 2. Qc2.  The queen has several other squares she can escape to, but they can all be refuted by black with an immediate mate in one (either Ra2#, Rb1# or d1=R/Q#).  So Idea 3 has helped us find our second specific candidate move (2. Qc2).

Idea 4 – reinforce/defend the attacked square or piece (the white queen).  There are no legal ways to defend the queen.

Idea 5 – counterattack with an equal or greater threat (of checkmate in one).  Looking at the EGT chart from earlier we can see that against a mate in one threat, the only EGT possible must begin with a check.  In this position there is only one, and that’s the capture-check on b2 (2. Qxb2+).

This process has generated three specific candidate moves that we can enter in our chart:


The next step is to calculate each of those three (and ONLY those three!!) candidate moves.  How to pick which one to calculate first?

We can either start with the most forcing, or the easiest to refute.  I think I’ll start with the most forcing this time, which is the capture-check 2. Qxb2+:

This greater threat allows us to change the position, but it is not yet clear if it will lead to a WIN, DRAW, or new possibilities to DEFEND…or if it leads to a loss and the move is just plain bad!

As mentioned above I personally like to start by looking for draws by stalemate first because it is the easiest to eliminate.  In most positions you’ll have multiple pawn moves or your pieces will enjoy freedom of movement around the board, and you can very easily see if stalemate is an option.  A quick glance at this position shows white has very limited moves, which is an indication that stalemate IS in fact a defensive option for white.  White's only pawn has no move or captures, and the king is in the corner and cannot move.  If we can force the queen off of the board then white will have no legal moves...we would just have to make sure that it is white's turn to move and not black's, which would turn a stalemate position into a checkmate position!!  Stalemate positions are often very easy to recognize.  The tricky part is to remember to consciously search for it!

Back to the check.  Black now has one capture, and two king moves in response.  Let’s see which of the three variations is best for black starting with the most forcing (the capture):

(1) 1…d2 2. Qxb2+ Rxb2  Stalemate.  Since our initial assessment was that white should be fighting for a draw, this should be good for white.  But before making this our KOTH, we need to see if there are any replies black has that are better for him than a draw?  Let’s see.

(2) 1…d2 2. Qxb2+ Kb4 3. Qxd2+ Kxc4  Endgame tablebases will say this is a win for white in like 50 moves.  The general process is to get the king active, win the black pawn, then the Queen vs Rook endgame is a technical win.  Practically speaking this endgame is very hard to actually win, but black is at a disadvantage because his king is already on the edge of the board.  Although the outcome OTB would most likely be a draw, it is only white that has any winning chances.  So black should reject this line in favor of the forced draw by stalemate.  There is only one other option for black after the capture check.

(3) 1…d2 2. Qxb2+ Ka4 3. Qxd2  This is almost identical to the variation above, except this time white has an extra pawn, so the evaluation would be slightly better for white – most likely a draw, but winning chances for white.  Black should reject this line, too, in favor of the stalemate since a draw is better than a loss!

We can now say that the mainline for this variation is the first one, leading to stalemate.  Here is an updated chart showing our variations, evaluations, and current KOTH:


White’s current KOTH is stalemate, which is pretty good considering he was fighting for a draw in our initial evaluation.  But let’s check to see if either of white’s other candidate moves offer him anything better than a draw, starting with the most forcing (the capture) 2. Qxd2:

1…d2 2. Qxd2 (unpinning the b2 rook) Rb1#  A clear refutation of white's candidate!  Here’s our updated chart showing this line:


White’s current KOTH is still stalemate, but let’s quickly check his last candidate move 2. Qc2:

This candidate is also easily refuted by black with the simple promotion -- 1…d2 2. Qc2 d1=Q+ 3. Qxd1 Ra2# (3. Qc1/Qb1 QxQ#)

Here again is an updated chart showing this final candidate move:


So this process has shown us that white has only three candidate moves to consider -- one of them leads to a stalemate by force (since all other black replies lead to winning chances for white), and the other two candidates lead directly to white being checkmated.  In conclusion, white's best move is to go for the stalemate.

This is the process you should be able to do mentally:  use ideas to search for specific candidate moves, calculate each one completely, and then pick the best variation based on the final evaluation.

In the next post we'll look at positions where we use an equal or greater threat to force a position with equal material.

Saturday, April 4, 2015

Calculating Forcing Moves: Defensive Idea 5 - Counterattack to WIN!

We have finally come to the most exciting part of this defensive calculation blog series -- counterattacking to WIN!  The ideas in the next few posts generate the kinds of moves that annotators like to give one or two exclamation marks.  You'll see that the thought process and logic for finding these double-exclam moves is rather simple.  The hard part is calculating the actual lines.  That is because what you're doing is dangerous.   You're leaving one threat and creating a brand new one -- threats will be spreading across the board like wildfire.  There can be many branches of variations that run several ply deep.

Can you manage the chaos?  Will you get overwhelmed by the variations and the greater risks of miscalculating your idea (possibly even checkmate), and simply avoid counterattacking completely?  It is very simple to defend or move a piece that is being attacked.  The variations are short and easy to calculate, and there's often no major change to the status quo on the board.  There is little to no risk in making those moves, and they rarely ever get (or deserve) an exclam.

Counterattacking can be very upsetting to your opponent.  They expect you to defend or move, but you just ignore their threat!?  If you dare to venture into the wild lands of counterattacks, searching for those single or double exclam moves, then read on!

I titled this post "counterattack to WIN", however, when you begin calculating a counterattack you don't know where it is going to lead.  You will never know at the outset that you are calculating to win.  That said, you will always have some sort of expectation.  An easy example is when you have a big material advantage but your opponent has a strong threat.  If you can stop the threat, you'll win easily.  You might begin to falter if you fail to find a move that allows you to keep your material, and you just don't search (well enough) for defensive moves, or fail to find the forced draw.  The opposite situation can also be unsettling -- you're already down material and think you're losing, and are desperately seeking a way to survive the threat.  You may unintentionally exclude certain candidate moves that actually win.  The outcome of your calculations don't meet your expectations.

To avoid losing your way inside the counterattack variations, set your expectations aside going into the variations and always search for all three possible outcomes:  win, draw, or defend.

In the next few positions we'll look at counterattacks that result in a win.  In subsequent posts we'll look at counterattacking to draw, and counterattacking to defend.

As noted in previous posts every counterattack begins with an equal or greater threat.  That is the idea we'll use to generate specific candidate moves.  So let's get started.

White just played Rb7.  Black to move.

3r1k1r/pR4p1/6Q1/4pp2/P1Pq3P/8/5PB1/6K1 b - - 0 0

Let's evaluate the position and then find all of white's threats.  Black is up the exchange, and has a better pawn structure (three islands compared to white's four).  Black is playing for a win and has the simple plan of making equal piece trades, picking off white's weak pawns and promoting to a new queen, while white is playing for a draw and has OK drawing chances.

White is threatening mate four ways: 2. Qf7#; 2. Qxg7+ Ke8 (only) and then 3. Re7#, 3 Qf7#, or 3. Qe7#  He is also threatening black's pawns on f5 and a7.  The mate in one is white's greatest threat, so let's now look at the five defensive ideas to see what candidate moves we find, calculate each one, and then pick the best move.

Idea 1 (capture, pin, deflect):  none.
Idea 2 (block):  1...Qd7 (fails to 2. Rxd7).  1...Rd7
Idea 3 (move):  there are no escape squares for the king, and black can't create any.
Idea 4 (defend):  black can defend the g7 pawn with 1...Rg8, but that does nothing to defend against the mate in 1 so we won't calculate it.
Idea 5 (counterattack with an equal or greater threat to WIN, DRAW, DEFEND):  We begin by looking for equal or greater threats (EGT), which give us time to control the board for a while.  Look back at the EGT chart, and you will see that in response to mate in one threat there are zero equal threats, and greater threats must begin with a check, of which black has three:  1...Qxf2+, 1...Qd1+, and 1...Qa1+.

So that gives us four candidate moves to calculate (one block, and three checks): 1...Rd7, 1...Qxf2+, 1...Qd1+, and 1...Qa1+.  Let's start with the most forcing move, the capture-check 1...Qxf2+:

White has three replies -- one capture and two moves.  The most forcing (and likely refutation) is the capture 2. Kxf2.  Now white is still threatening mate, and black is running out of defensive options.  He must check!  So 2...Rd2+ 3. Kg1 Rd1+ 4. Bf1 (not 4. Kh2 because that allows black to bring in another piece with 4...Rxh4+), and now black is completely lost.  He can only block the checkmate with the now useless block (because it is undefended) 4...Rd7, or he can again try his last check 4...Rxf1+, but after 5. Kxf1 black has zero options to defend against checkmate.

This path was worth exploring to search for drawing resources.  In this position stalemate would not be an option because of black's multiple pawn moves, so repetition would be the only option.  If there was a forced draw, we would have made that variation our King of The Hill (KOTH), and then continued our search to look something better than a draw (wins).  But unfortunately for black, he can't force a draw with this capture check, and 1...Qxf2+ is easily refuted.  Next up is 1...Qd1+:

White has two replies -- one block, and one move: 2. Bf1 and 2. Kh2.  Neither are particularly forcing, so let's start with the block 2. Bf1.

Now white is still threatening mate and black's next move must address that threat.  The first check has not given black any new defensive options (Idea 1 - capture/pin, Idea 2 - block the attackers, Idea 3 - move the king, or Idea 4 - defend f7), but using Idea 5 we do have new checks to look at 2. Qxf1+ and 2. Qg4+.  The capture check is the most forcing but the other check also attacks white's queen, which is threatening mate so let's check that one out:  2...Qg4+:

White has four replies -- one capture, one block, and two moves -- but since white's queen is hanging 3. Qxg4 is forced.  After the simple recapture 3...fxg4 black is now winning!  He was able to use the time gained from the check to force an equal trade, which since he was up the exchange this was his basic plan to win the game.

But white had another defensive reply that might be better for him.  So let's back up and look what happens after 1...Qd1+ 2. Kh2:

2...Rxh4+ and white has one block and one move.  If he moves with 3. Kg3 Rg4+ wins the queen for the rook.  If he blocks instead 3. Bh3 Rxh3 4. Kxh3 (forced; if 4. Kg2 Qh1#) Qh1+ 5. Kg3 (only) Rd3+ 6. f3 (only) Rxf3#.  So 2. Kh2 is certainly not better for black!!

That means our current KOTH variation is 1...Qd1+ 2. Bf1 Qg4+ 3. Qxg4 fxg4, which leaves black with a winning material advantage.

Before making the move we need to calculate black's other two defenses (1...Qa1+ and 1...Rd7) to see if they are better than our KOTH.  First is the more forcing 1...Qa1+:

Here white has two blocks (2. Rb1 and 2. Bf1) and one move (2. Kh2), but 2. Rb1 just loses a rook for no compensation, and 2. Kh2 allows black's rook to join the attack with check.  After 2. Bf1, white is still threatening mate, has only one check that just loses the queen, and now has no options to defend against the mate in one (the block 2...Rd7 fails because it is undefended).  So we can reject 1...Qa1+ since it is not better for black than our KOTH.  Next up is the block 1...Rd7:

Due to the activity of white's pieces, he has lots of good options here.  If black can make equal trades (rook for rook, or queen for queen) then he should win.  I think easiest and most convincing for white begins with the forcing capture-check 2. Qxf5+:

Black has zero captures, one block (which leads to mate in one after 3. Qxf7#), and three king moves (2...Kg8, 2...Ke8, and 2...Ke7).  Since there isn't a most forcing variation, let's start with moves we can easily "trim".  Now 2...Kg8 appears to be the worst for black because of 3. Rb8+ Rd8 (only) 4. Rxd8+ Qxd8 (only) 5. Bd5+ Qxd5 (only) 6. cxd5 wins for white.  That leaves us with the two king moves and I think we can also trim 2...Ke8 because if 1...Rd7 2. Qxf5+ Ke8:

3. Qe6+ wins one of black's rook, because again black cannot capture the queen and his one block (3...Re7) leads to another mate in one.  If the black king moves away from defending the e7 rook (with 3...Kg8), then white simply takes black's e7 rook, and if the black king tries to guard the rook (with 3...Kd8) then the simple skewer 4. Rb8+ picks up black's h8 rook.  So we can reject 2...Ke8.

Those two replies were easy to trim, and leaves us with 1...Rd7 2. Qxf5+ Ke7:

Here I like 3. Qf5+.  If possible white would like to push the black king to a light colored square so his bishop can join the fun, so checking with the queen on dark squares helps that while also controlling the d8 square.  Black cannot capture the queen and has no blocks.  The king has five moves.  Since none are particularly forcing, lets again trim the bad ones first.

Both king moves to the back rank fail to 4. Rb8+ -- if 3...Kf8 4. Rb8+ and since the queen is now covering d8 the block (4...Rd8) is simply not safe (two attackers to one defender), and if 3...Ke8 4. Rb8+ Rd8 and now the bishop gets to join with 5. Bc6+ Kf7 (only) 6. Rb7+, and now black has no captures, two blocks, and three moves.  Let's start by trimming:

if 6...Kg8 7. Qxg7#
if 6...Kf8 7. Qxg7#
if 6...Ke6 7. Qg6#
if 6...Rd7 7. Rxd7+ Qxd7 8. Bxd7 is winning for white, and
if 6...Qd7 7. Rxd7+ Rxd7 (forced, any king move leads to mate in 1) 8. Bxd7 is winning for white.

Was this line any better for black? Our KOTH is1...Qd1+ and then 2...Qg4+, leaves black up the exchange.  All other move one alternatives were worse for black because they were losing.  Not much of a comparison!

To recap, in this position we used our search for greater threats to discover defensive resources that allowed us to force an equal exchange of one of the pieces threatening mate.  Because black was already ahead material equal trades will result in a win for black...but he'll have to fight for it in the endgame.  If material was somehow equal in the beginning position than this post could have been called counterattacking to defend!

One of my favorite examples of counterattacking to WIN was included in an earlier post.  Counterattacking should not be something you only consider out of sheer desperation.  No, you should force yourself to use all five defensive ideas when dealing with a threat, and train yourself to use Idea 5 in particular and search for all equal or greater threats you can create.  You'll be finding some amazing resources once you do!

In the next blog we'll look at counterattacks using EGTs that allow the defender to force a draw by perpetual check or stalemate.